When working on the corrected pattern, I struggled with making the back hemline smooth and even along the span of the VERY substantial in-seam gore that had been created. I thought about it and thought about it, and finally decided that it needed to be redone. Not only was the increase too much to insert into one spot, the in-seam gore would make boning the corset problematic. I took some time and reviewed source materials for Victorian period corsets. They used gores extensively, and they were virtually never inserted into the seams. So I turned back to the mockup and decided, based on the amount of spread needed, that two gussets set into the back panels would give better results. I called Mom, and she came over this morning to help redo the fitting.
More, including the
de rigueur photos behind the cut.
To prepare for the new fit changes, I first went and re-sewed the seams I had opened
during the first fitting session. I also took a moment to sew in most of the other changes, including the updated bust seams and straightened center front seam. I drew pencil lines where I wished to insert the new gores, and fused down 1" wide strips of fusible interfacing to stabilize the cuts.
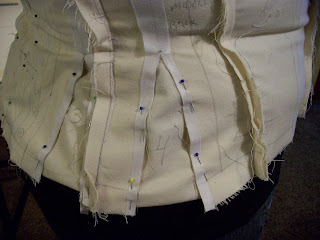
 |
| Preparing the canvas for new gussets to be inserted |
We cut open the new slashes about 2/3 of the amount I estimated would be needed and then pinned the canvas on. Then, carefully, working a little at a time, the slashes were extended until the back laid relatively flat. There is still some pulling across the back; this is a corset designed to take less than an inch off of my waistline, but it is therefore too tight to lay smooth without boning.
 |
| The corset back, slashed open |
We then went through the same steps we did the first time around, and filled the openings with fabric. The new insets were marked and labeled. I think the look is much improved so far.
 |
| New gores are pinned in |
If you recall, the last fitting had a big gore on the seam. When laid flat, the gore poked up and made a big lump along the hemline; this made some sense, as it would eventually cover the big lump that is my behind. However, the gore was intrusively large and did not create a nice curve. See how much difference the slashed gores make in improving the line of the garment:
 |
| The first version of the corrections, with the large gore towards the left |
 |
| The new gores - much smoother! |
The next step is to cut another mockup. The next mockup will be more complete, and will include boning and eyelets. I think I've mentioned that I am going to make it out of ticking, or at least what Jo-Ann Fabrics calls ticking, which is really just printed canvas with the traditional stripe pattern found in mattress and pillow ticking. (Real ticking is an extremely tightly woven twill, designed to keep feathers from escaping from pillows and mattresses.) It looks like this:
 |
| Ticking stripe (image from Jo-Ann Fabrics' online catalog) |
The seams will be flat-felled and the boning inserted directly into the felled seams, which I intend to topstitch with caramel colored heavy-duty thread, like a pair of jeans. The whole garment will be interlined with white muslin, as the ticking stripe is not as smooth as the canvas drill and also more prone to stretching, as it is not as tightly woven. The eyelets will be brass, and the top edge bound with navy bias tape. To fit, I will just baste the seams down and insert the boning; it will have its eyelets, but the edges will be bound and the seams felled after the fit has been checked.
I know, it seems like a TON of work.... but I want to do it right!


Sounds fascinating! I wish I understood more, but I'm definitely impressed.
ReplyDelete