Monday, November 8, 2010

Playing catch-up... soon

Steamcon fast approaches, and I've been working.... but not blogging.  Lesson learned:  post within 24 hours, and post after every major session or it doesn't get done!  I now have about a billion photos to process and try to remember what they were taken to document as I've worked.

I will catch you all up on my progress, but not tonight.  It's already been a monstrous long day, but for now, here's just a few to give you an idea of what I've accomplished so far:

The corset back, finished

The cropped jacket, mocked up in muslin

The cut jacket yoke and collar, embroidered

Wednesday, October 13, 2010

Workroom Session #16: Cutting a jacket muslin

Tonight I stopped of at Byrnie Utz and picked up a hat.  I had one I liked online, but didn't know what my hat size was - so I was going to stop in to the local fancy hat shop and find out and then order it.  However, they had a nice hat that I liked on hand for about the same price.  It's not so much a gambler with that distinctive pencil roll edge, but it suits just fine.  I'll take pictures tomorrow when my mother's here to help check the corset and jacket fits.

I also prepped the jacket pattern.  I am using Simplicity 2344 as a base; it's just a princess-seam, band collar jacket, but it is in my size and it should be easy to make the changes I am looking to make.  This particular pattern is nice in that it contains separate patterns for different bust sizes!  It did mean that there are a LOT of pieces on the tissue.  It took me a bit to hunt down all the pieces, cut out, and press them.  I have cut out the collar, fronts, backs, and one sleeve, but it was late enough that I did not want to start the Mercury.  stitching the parts together will not take long. 

Short post tonight, it's late.  See you all soon!

Monday, October 11, 2010

Workroom Sessions 14 & 15: Back facings, setting eyelets

I have been a bit remiss, and I am behind on my timeline.  I am VERY glad I set an early deadline because I now do not believe I will make completion for Halloween.  I do still think I have time to make good for SteamCon, though!  I worked a bit on the 7th, and in little bits and pieces between now and then; I put in another very good, very productive session tonight.

Last Thursday I prepared the back pieces. I took photos of the gussets, but that is old hat - they are just more of the same, so I will spare you the bandwith and not upload those.  However, the center back pieces do have a bit that is different.  They have facings that run up the edges.  I cut strips to use for this when I cut the garment, and even fused them with some mid-weight interfacing.  Now it was finally time to apply them.

Unlike the bone casings at the center front and sides, the facings go to the inside.  I suppose I could have turned them to the outside, but chose not to for... not sure.  It doesn't matter.  I pinned the strips on to the shell pieces and stitched them.  I did not trim the 1/2" seam allowances, as I knew they would be fully encased and would only serve to add body and structure to the area that takes the most stress.
Center back facing, pinned to the shell

More after the cut...

Wednesday, September 29, 2010

Workroom Session #13: Gussets and casings

I started out tonight with the intent of preparing the four back gussets - but plans change!  I did sew in the gussets on each of the middle back pieces.  I noted that I didn't catch the top edge of the slash on the body, but that's OK - the structural nature of the flat felled seams made it a non-issue (although I did have to spend a moment or two mentally reminding myself, "it's just a costume!").
Detail of casing stitchlines crossing gusset point, right side

 Continued behind the cut.....

Tuesday, September 28, 2010

Workroom Sessions #10, 11, 12: Construction

Well.... I have let myself get behind.  Every so often I get bogged down with a bit of existential angst.  I had about a week where I got very little done in my day to day life, let alone the project at hand.  I worked on Saturday (the 18th) a bit, but had plans for the entirety of the 19th that turned out to be both extremely fun and a little stressful.  That stress was very difficult to recover from - and the costume project probably contributed.  I had not been eating well, and the strict schedule of work left me feeling a little isolated and a little pressured.  Once I had gotten off schedule, I had a difficult time getting back on.

Also, I had not blogged the work I had done on Saturday.  Now, more than a week later, I am going through the pictures and kind of scratching my head.  What exactly did I do each day?  What was my process?  Lesson learned - write after EACH sewing session!  As it is, I have that session, some work from Tuesday, and now tonight's workroom session to talk about.  This post will be big!  To help keep things a little more manageable, I will split the work sessions up.

Session #10:  Joining the first pieces

Saturday I started the process of connecting the pieces.  Since the whole project will be worked from the center front outwards, I took the next pieces out and prepared them.  In this case, that means I needed to sew boning casings to the inside of the middle front pieces.  I rolled off lengths from the packaged featherlite boning and cut the pieces including the plastic bone.  The bones themselves will be cut down to fit post-binding.  I marked each plastic bone and each piece of casing with one dot at the top edge, and removed the cut plastic bone from the premade casing.  This was pinned onto the muslin side of each piece at the top notch, following the stripe.  I stitched down the casing following its stitchlines; technically this is bottomstitching, since it was done from the wrong side of the finished garment.  The casings went on quite nicely.

Continued after the cut.....

Wednesday, September 15, 2010

Workroom Session #9: Preparing the pieces

 I started out tonight by cutting the remaining pieces and preparing some auxiliary bits.  I plan on a triple bone at center front since there is no  busk, and double bones up the sides.  These will be slipped into cases made of the shell fabric, stitched to the exterior of the  corset.  I also prepared facings for the center back and fused them with a little bit of interfacing to help prevent raveling around the grommets.  There will also be a modesty panel inserted under the lacing gap, but I need to wait to prepare it until after I have trimmed the top edge.  I will also be cutting each gore piece to match its stripe just  before it is inserted.
Back facings, prepared with fusible interfacing
The plan is to start at the center of the front and work outwards.  To this end, the very first thing to be done is sew down the boning case at the center front.  I took the strip I had cut and trimmed it to length, and lined it up with the clips at the center front.  I marked where the stitch lines would need to be with little dots (the lines are straight and don't need to be drawn since there are stripes to follow).  I pressed under the edges and pinned the strip onto the body piece.  I also used a few pins to hold the muslin interlining secure to the ticking.  I don't use a whole lot of pins, but they definitely have their place.

Workroom Session #8: Cutting, accessories, and a little history

I started out by digging through my fabric stash for something "right" to jump out at me to use as the interlining for the corset, as I feel the ticking is actually a little bit stretchy.  I found a piece of shirting, but it wasn't enough sturdier than regular white muslin to justify cutting so nice a piece of cotton.  I briefly considered a piece of caramel colored vintage linen; the color would be lovely, but I was concerned that the age of the fabric could compromise its strength, and that the surface is a little rough to be worn against the skin.

Cutting the muslin interlining
So muslin it is... but I cut on the cross-grain.  The muslin was cut on the double (folded selvage to selvage), and the peices arranged perpendicular to the fold.  This is 90 degrees off of how you would usually arrange the pieces on the fabric, but normally you want the vertical length, along the warp threads, to stretch the least.  I wanted that touch of extra beefiness to run horizontally instead.

Saturday, September 11, 2010

Workroom Session 7: Finishing the pattern

I was a little bit of a slacker and didn't use my 5 hours very effectively today.  However, I did manage to get a few important things accomplished.

First and foremost, I have finished the pattern.  I didn't take a lot of photos along the way as the final stages of drawing the pattern are rather uninteresting.  The one thing that was relatively interesting - measuring the sewn length of the seams to check that the pattern edges would fit together - involves bending a flexible ruler around any curves on the seamline.  It takes both hands, so I wasn't really able to take pictures.

I made a few decisions about the sewing process.  One, the center front will be cut on the fold.  It will have a strip of fabric running down it with THREE bones, applied to the outside of the corset body.  Two, the pieces need to be cut out one layer at a time so that some attention can be given to matching the stripe.  Three, I will be underlining it and am starting to think that I should use coutil for that.  I'm not sure, though - I need to go up to Nancy's and see what the stuff actually looks like.

I also made one more gusset sample.  I'm happy with how it came out, but realize that I am going to need to practice controlling the Mercury a little more before I work on a finished product.  I have just the thing for that.  There are a few exercises in my text from my design school class.  I will go through them; that should be adequate to fine-tune my ability to drive the machine with good results.  I may also need to adjust the machine a bit more, and the only way to know for sure is to experiment a little.  This will be high on my to-do list, as I would like to get the corset constructed by this time next week.

Since I've decided that I will be making a denim skirt and jacket to go with, I went to have a look at yardage for that.  I started at Pacific Fabric's outlet in SoDo.  They had lots of denim flat-folds, but it was all heavyweight.  I need a rather light denim, so that was right out.  I came home via Aurora and popped into the Shoreline Jo-Ann Fabrics.  They had a nice 6 oz indigo denim for a reasonable price.  I went ahead and purchased it, and had a look at patterns for the jacket.  I was sadly dismayed by what the plus-size pattern selection looked like.  I wanted a basic shirt pattern and a basic princess-cut jacket pattern.  I did find a jacket pattern, but no blouse pattern that I was happy with.  (I'm secretly hoping to just buy a top to go under the corset and jacket, but we'll see what I can find.)  The jacket will need to be modified, but that was the plan anyway.

Wednesday, September 8, 2010

Workroom Session #6a: Developing a new sketch

I also worked on a new drawing tonight.  I did not get it colored, but I did get a nice design worked up.  The base is the striped body, with the flare skirt - paired up with a short jacket with elements of classic denim jacket elements, military look, shirred 3/4 length leg-of-mutton sleeves and a shaped hem.  If I were to make this, I'd seek out a commercial pattern for a simple jacket and tweak it to suit.

The preliminary step did not photograph adequately to show.  The base for the figure was drawn VERY lightly, using blocky geometric shapes to frame out the figure.  You'll notice that the figure is, for a fashion drawing, fairly robust.  The garments are for me, so I see little point in sketching them on a super skinny fashion figure.  The next stage was to rough in the figure a little more, getting the pose ready to be used as a base for the clothing.
Stage 1:  Rough figure
Continued behind the cut....

Workroom Session #6: Something different

I didn't get much done during the long weekend.  Instead, I relaxed and had a nice time.  This has, of course, put me somewhat behind where I'd like to be.  I had not decided for certain what I want to make. I had not done any sketches, I had not moved forward with building the striped corset.  After a little bit of contemplation, I realized that I'd be happier if I had something that could be accomplished relatively quickly and still look great for convention; if I had time left, *then* I could go back and make a third build of the corset with a front-opening busk and a fancy dress.  Anything else can be produced at my leisure and enjoyment once I have something to present at SteamCon.

So, I will be building the ticking-stripe corset.  It will be the focal point of an outfit, paired up with a jacket and skirt made out of lightweight, dark colored denim.  The skirt will simply be a calf length flared skirt; the jacket is looking like it will be a cropped military jacket.  I'll pair this up with a straw gambler and natural leather accessories.  I worked on some sketches tonight.

Art behind the cut.....

Sunday, September 5, 2010

A break from the workroom

It's a three day weekend.  I'm taking today off, but plan to use my paid holiday to sew quite a bit.

Well... more accurately I'm taking today off from the sewing machine.  I'm going to be ordering myself a pizza for dinner and working on some sketches afterwards.  I am also going to be doing some tidying up around the sewing area and making some layout changes to this here blog.

The problem for the current project is that I don't *actually* know what I'm making!  I know I have seven weeks until Halloween, and that I am approaching construction time on a garment; the garment is still just a mockup, but should be wearable and easily integrated into a Steampunk wardrobe.  That doesn't make an outfit, though.  I have given myself a new deadline - I will make a decision on what I am going to make by the end of the Labor Day holiday. I need to keep it relatively simple, as the time is flying by.  I have used 20% of my workroom hours and haven't even really begun.

My mother mentioned yesterday that the work I've done so far is well beyond what the average home sewer could accomplish.  She's got enough skill herself to make an easy to moderate pattern; she can make a buttonhole, put in a zipper, hem, knows how to operate a home machine, etc.  I also had a comment from a friend on yesterday's late night entry saying "I wish I understood more."  I forget that my audience isn't indoctrinated in the special jargon that comes with sewing.  Where this is intended as documentation for my procedure and not as an educational blog, I don't want you all to be lost.  I simply don't have the time to define every single term along the way, but if you see something that interests you or leaves you particularly perplexed, let me know so I can tell you more!  Comments are a great place to ask questions.

I've already begun to think about what I will do once the SteamCon project is completed for this year.  The obvious answer is "Start on next year's!"  The less obvious answer is to find something in it all to take to market, but another thing I would really LIKE to do is get into more of what I just said this blog isn't - teaching other people about sewing.  You'll stop seeing Workroom Session posts and start seeing posts that are headed up with Sewing 101.  After Steamcon.  Until then, I'll keep showing you all what I'm doing each day as I work.

Workroom Session #5a: Gusset practice

As I was waiting for my mom today, I realized something.  If I was to make the changes I wanted to make, I was going to have to sew in triangular gussets into a striped fabric.  Yikes!

I have never done any sort of gusset, gore, or godet.  The closest I have come is setting a sleeve placket, which is a strange sort of fabric magic.  It's right up there with zipper flys, which come out nicely every time but I couldn't really tell you how or why.  I had an idea of how to do it, but wasn't sure.  I looked in a few of the sewing resource books I have around, and didn't find anything useful.  So, being the sensible creature that I am (and also too lazy  to paw through all the back-issues of Threads on my shelf), I immediately sought out help on the Internets.  I found a very nice tutorial on machine-sewing gores posted to a blog by a local costumer.  Or well, at least someone who says they are a member of the region's SCA chapter, An Tir.  Thank you so much for the help, Internet!

More, including photos, of my self-taught gore lesson behind the cut.

Saturday, September 4, 2010

Workroom Session #5: Corset fitting redux

When working on the corrected pattern, I struggled with making the back hemline smooth and even along the span of the VERY substantial in-seam gore that had been created.  I thought about it and thought about it, and finally decided that it needed to be redone.  Not only was the increase too much to insert into one spot, the in-seam gore would make boning the corset problematic.  I took some time and reviewed source materials for Victorian period corsets.  They used gores extensively, and they were virtually never inserted into the seams.  So I turned back to the mockup and decided, based on the amount of spread needed, that two gussets set into the back panels would give better results.  I called Mom, and she came over this morning to help redo the fitting.

More, including the de rigueur photos behind the cut.

Wednesday, September 1, 2010

Workroom Session #4: Correcting the pattern

I didn't get anything done yesterday; I wasn't mentally focused at all and so decided to move my scheduled times up a day this week.  So today is the first of two weekday sessions.  Not too many pictures today, in part because the task at hand turned out to  be a little difficult to document.  I did the first part of making the pattern corrections, which went very quickly.  I got through all the pieces, including making a new piece for the gore.  There is another step, truing the modified pattern, before I can really say it's done and feel comfortable cutting the next mockup.

Back to tonight's work!  The first and second pomodoro were spent preparing.  I took the time to repair my workroom table; one of its casters had come off, and it had gotten a little wiggly.  I cleared it off, turned it over, and went around and tightened each of the caster nuts with pliers.  I also tightened every bolt to make the table more stable.  I had to use my bike multi-tool.  You'd think I'd own a set of hex wrenches, but no.

Then it was time to get to work on making my pattern corrections.  For each piece, I started by making a quick tracing of the original pattern piece.  I then took a good look at the changes marked on the canvas fitter for that piece.  I found it useful to take out the pins and darken the marks my mom made.
The marked canvas
Since I knew I was going to have to add 1" to the top and bottom of each piece, I started with that.  Then, I carefully transferred the fitting marks to the pattern copies.  I used gauges to try to make this process as accurate as possible.
Gauges showing that changes are accurate
Then, any editorial changes were made.  For example, I added a little more curve to some of the back seams to help blend the gore in a little better, and I also added some length at the bottom center front and center back above and beyond the 1" I had already added.

I did have to make a new piece for the gore.  I unpinned one of the inserts from the canvas fitter, and used rulers to make the shape on paper.  I added some matching marks along each leg of the gore to help make sure it would be sewn in the right way, as the two sides are both slightly curved and are not the same length.

The new pattern piece
The next step is truing the pattern.  This is one of those things that a lot of people wouldn't be bothered with, but I feel it's important to make my pattern as technically correct as possible, and with the significant changes from the original I would like to be doubly sure that the pieces will fit together correctly.

Before I can sew, I will need to make a run to the fabric store; I want to purchase bias tape for the bone casings, and possibly some better thread.  Ideally when I am done, the fitter will be a wearable corset of its own, so I may also pick up a few yards of trim.

Sunday, August 29, 2010

Workroom Session #3 pt. 2: Fitting the mockup

I had invited my mother over to help out, as she has adequate sewing skills to help with the fitting process.  We started by pinning the garment onto my body.  As predicted, there were some fitting issues.  They were not the ones I expected.  First, the length really did need to be added.  I will be keeping the inch all the way around, as well as adding a little additional length to the center front and center back.  Second, the overall fit was too large at the top, and too small across the bottom of the back.


Workroom Session 3: Making a mockup

I worked for several hours today on my corset.  The first portion of the task was to transfer the pattern to fabric, which would then be cut out and sewn.  For a regular garment, muslin is the norm; however, I opted to use unbleached cotton drill (similar to duck cloth, but with a twill weave) as a finished corset is generally a fairly sturdy garment.

I started out by laying the pieces out on the doubled fabric to get an idea of how much I would need; I cut that section of fabric off of my stock and pressed out the wrinkles.
The pattern pieces laid out on canvas drill

Center back
Pieces with seam allowance added
Then I traced the pieces using a regular old #2 pencil.  I then had to add seam allowances with a grid ruler and curve, since my graded pattern did not have allowances.  Since I predicted a need for additional length, I added a full inch at the top and the bottom.  I used half inch seam allowances on the seams, and included a 2" allowance at the center back, with 1" representing the opening between the lacing.


I then had to flip over each cut piece and copy out the pattern markings onto the other side, so that I would have a fully marked right and left side.

Left and right pieces

Completed, I finally had a whole garment to be stitched!  At last, actual sewing to be done.  Actually stitching the seams together on the Mercury took about 20 minutes, including futzing about with the machine.

Since I've been having serious difficulty getting my photos into this post, I am going to split it to make it a little less picture-heavy.

Friday, August 27, 2010

Workroom Sessions #2 & #2.5: Pattern grading - slash and spread

I worked on Wednesday, as planned, but got wildly distracted between work sections, so only got in three of five planned pomodoros.  I needed to make up those two missed timer sessions to be on track, so I did so tonight.  I finished my pattern grade, and wow, hard to tell if the pictures are useful.  Only one of them is actually bad.

At last entry, I had finished copying the commercial pattern, and had cut it out sans seam allowances.  Now, I needed to enlarge the pattern by a certain amount to fit, as I am somewhat larger than the biggest size on the pattern.  Somewhere in a previous post I discussed how much the pattern needed to be changed.  I had to enlarge each side of four seams by 5/8" at the bust, 7/"8 at the waist, and a scant 1/2" at the hip.  This is a bit of an issue, since this particular pattern doesn't have a waistline indicated on the original, and the bottom edge of the garment is well above the place where you would take a hip measurement.  I also know that I'm likely to need more length, as my -ahem- voluptuous figure will need more fabric to cover my larger bust, hips, and seat.  I also know that some of the seam lengths may not match up exactly any more.  Those little details... well, they'll get worked out at the first fitting.  That'll be tomorrow afternoon.

In the meantime, let us return to stretching the pattern pieces to accommodate my measurements.  I used slash and spread, and did it in a very rudimentary fashion.  If the garment had things like... oh, armholes or a neckline, I might have had to take a little more time and effort.  But since it doesn't, it was actually relatively easy to grade up.  I experimented a bit with fancy cutting of the pattern (you'll see this below) but for the most part found I could just as easily work by simply splitting the pattern up the middle and moving each half over the specified amounts at the specified places.

For each piece, I started out by drawing some landmarks on both the underlying pattern paper and on the copied pattern piece.  I often use the grainline vertically and any notches as horizontal marker points, although this isn't set in stone as sometimes the notches were pretty close together.  This isn't the best picture, since I had not yet placed, horizontal guidelines, but you get the idea:

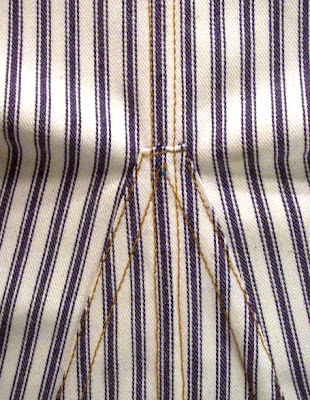
Next, the pattern piece is cut vertically.  Some folks also like to make fancy horizontal cuts so that the edge can just be kind of bent out to where it needs to be.  I only did that on this one piece, and found it to be a fail with this particular pattern because the side seams just got weird and bumpy.  I did, however, take a picture to demonstrate the concept:

left half has horizontal cuts to allow side to flex

detail showing how slashes allow pattern to be reshaped

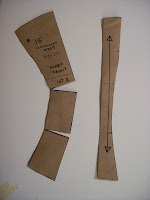
With the pattern made flexy by cutting *almost* to the edge, in theory you can just pull the whole edge to the new widths needed and blend any curves that need it.  With this particular pattern, I had better luck just spreading the pattern parts, and, using my trusty grid ruler at the centerline, moving it out and marking key points.  Then I redrew the new seams with a French curve.  Have a look at a couple of the pieces:
Last time you may recall a picture of the copied pieces laid side by side.  You could see some pretty dramatic negative space in the curve of the waist.  The new grade reduces that quite a bit, as I'm pretty thick in the middle; some of the new side seams are all but straight.  I am not shocked.
The complete graded pattern, laid out in order
I will trace this new pattern directly onto canvas drill in pencil, and then add 1" allowances at the top and center front, 1/2" allowances at the seams, and a 2" allowance at the center back marked in inches to allow for the 2" gap between the edges on the finished corset.  This will get its vertical seams sewn and will be fitted with the seam allowances to the outside.  Any change (and I predict many) will be drawn right onto the muslin, and then transferred onto the pattern.  My mother's coming over tomorrow at 3 to help, as it is virtually impossible to do a good job fitting yourself.  She's not an expert seamstress, but she knows enough to lend a hand here.

I expect a second fitting will be needed before I feel ready to order steel bones or cut a garment out of expensive coutil.  I also MUST finish the foundation garments before I can reasonably expect to fit the fashion garments, so this project must move on at a decent pace.

I am also planning to get in some drawing time this weekend.  I intend to draw a minimum of five designs with the fabric I have on hand or can obtain relatively cheaply.  I have a mind to use the beautiful purple boucle and matching plum pinstripe I have been hoarding, but also have a nice piece of navy wool, and a ton of leftover green suiting.  I could also easily use black and red, though I find the combo to be a little cliche these days, as black bottomweight can be had for a song and I have some very nice accent materials on hand, including some red on black pin.  Additionally, I have  considered doing a piece in denim (again, inexpensive) and caramel; this would probably be the most apt to adapt for the SteamCon II "Weird Weird West" theme.  I'll have to start drawing and see what I come up with.

Tuesday, August 24, 2010

Workroom Session #1 - copying a pattern

I had five Pomodoros worth of time to work with tonight.  (Read the previous post if you're already lost!)  The first was used for organization - I reviewed the time management technique, made an activity inventory and a to-do list for this evening's remaining time.  Three more were used to work on the pattern copy, and the last to update the ol' blog.

I promised procedural documentation as I move along, so you will get that.  Let me start you out with a look at the tools on hand for copying and then grading the pattern.  This is by no means a comprehensive set of pattern drafting tools, but it's actually more than I wound up using:

Tools for making a copy of a pattern
At the bottom is a good old fashioned yardstick.  The next row  contains a 24" flexible steel ruler, a hip curve, a drafting square, a french curve (it's a little tough to see as it's clear), a dressmaker's curve (broken - I've busted several over the years), a 15" grid ruler, and a Dritz ruler.  the top row is double-tipped Sharpies, a mechanical pencil, an eraser, drafting tape, and (left handed) scissors.  Those little grey things above the drafting tape are pattern weights, made by hand by my grandmother out of old-fashioned flour sacking, bird shot, and red sewing thread.  A bit homely, but extremely effective, and they were my Grandma's.  The paper I'll be drafting onto is brown packing paper, sold in 36" x 15' rolls for $1.50 at the local Pack 'N' Ship.

The sharp-eyed amongst you might have noticed that my scissors are labeled "fabric" and are clearly going to be used to cut some pretty rough paper!  Don't fear, gentle readers - where my inexpensive red handled, "true left" Fiskars were once my fabric shears, I now own a very nice set of 8" true left Gingher shears.

I cut out the original pattern pieces in the largest size, as I will need to size the whole thing up significantly.  The original tissues look like this:

Tissue pattern to be copied
I cut a section of paper off the roll and taped it to the table top.  I drew a couple of vertical lines to place the tissues' grain lines on.  Working one at a time, I traced each piece quickly in pencil, then used curves and straight edges to mark them out in Sharpie, transferring any pattern markings as well.  A second pass with a pencil and ruler marked in where the standard 5/8" seam allowances would be; these too were marked in in fine tip pen, and the pattern marks were transferred into the new line as the seam allowances will be cut off.  The copied pieces look a LOT more like production patterns:
All six pattern pices copied
Closer view of one piece

Closer view of another piece


I had one piece all the way done and another started when I began tonight.  The remainder took about an hour with no interruptions, but I was a little amazed at how tough it was getting to stand over the table and do the work.  I'm out of shape and out of practice!

Finally, I cut out the pieces; in doing, I also removed the seam allowance that is included in every commercial pattern tissue.  I haven't the foggiest idea why the pattern companies have settled on a 5/8" allowance.  It is, in fact, a rather awkward width to work with.  Even as a novice I would have appreciated a less bulky, floppy, and well.... odd width.  1/2" would be a huge improvement, and when I redraw my pattern I will add 1/4" allowances.  I don't need any extra as I am a skilled machine operator and the fit will be perfected ahead of time.

I took one additional step.  I laid out the tissues with the copies on top, just to make sure I hadn't gone totally off or done something stupid:

Left half (back)
Right half (front)


As an additional check, I laid all the pieces edge to edge, as they would be sewn:
the complete copied pattern

You'll notice that two of the pieces are upside down - that is because the pattern tissue is reversed to the other pieces, and I did not think to copy it so that it would be right side up in sequence with the other parts.  The piece labeled #19 is on the table, but it is underneath #18 as it is a reinforcement for the center back, where the corset will be laced.

Tomorrow night I will slash and spread the pieces to grade them to my measurements.  This is a pretty big grade (3-4 sizes) and so I don't expect the fit to be perfect; I will be making a dummy to correct any problems.  I am not planning to lengthen the pattern anywhere during the first fit, but I do expect length to be an issue, as well as fit at  the bottom edge since the length is not at the same point on the body that are measured for size benchmarks.  That's okay!  That's why at least one and more likely two pattern mockups will be made.

That's all for tonight - more to follow!

Saturday, August 21, 2010

Hang On Little Tomato: the Pomodoro Technique


Okay.  So.  Wacky graphics aside, allow me to introduce you to the Pomodoro Technique.  I know, this might seem esoteric, geeky, or irrelevant in light of the context - but it is a time management technique that matches up to my current practice and I hope to use to wring more value out of the workroom hours I have set aside.

I was chatting with my brother and very casually mentioned that I had set a timer at home with the intent to work for half an hour on a little housework project.  He exclaimed, "you have successfully used a unit of time called the Pomodoro!" and gave a two- or three-sentence rundown of the concept.  I promptly came home and looked it up on the InterTubes.

Some years back, a student was trying to figure out how to manage his time, made up his mind on a reasonable time and set a kitchen timer for that length of time.  His timer happened to be shaped like a cheery red tomato - or a pomodoro in Italian, as he also happened to be in Rome.  Since that time, Mr. Francesco Ferillo refined the idea and has developed a time-management system that is elegantly simple and effective, based on the idea of time-boxing and distraction management.  Since the publication of his book in 2006, the technique has garnered some serious attention amongst geeks and lifehackers, especially those who are wary and weary of other systems that are ponderously complex (and can eat up a significant amount of time and attention in and of themselves).

The book is worth a read - and it's available for free under Creative Commons license.  If you don't feel like bothering with the 40 page book, the one page "cheat sheet" PDF is well worth a look and describes the basic principles better than I have or could in this post.

I have long understood the value of time-boxing and have even used a timer, as I mentioned earlier.  I like the minimalist system and the ideas of distraction management and avoiding time-related anxiety.  I have already set out blocks of time that are Pomodoro-friendly, so it's a natural fit to try using the technique to squeeze the most value out of my 100 hours of workroom time.

Friday, August 20, 2010

New cards have arrived!

Well, I ordered new business cards a few days ago... and expected them a week out from now.  I paid a few bucks since I didn't like any of the free designs at Vistaprint this time around, and it was totally worth it:

Thursday, August 19, 2010

Steam Justice League


A friend IM'ed me the link to this and I *had* to share.  (She found it on majorspoilers.com, for the record.)

Coming soon: Workroom hours

My workroom happens to be my living room, but that is immaterial.  I am, however, setting aside some work hours to make sure that I have enough time for the SteamCon projects.  Beginning next week, I have blocked out 8 to 10:30 PM Tuesdays and Wednesdays and 11 AM to 4 PM on Saturdays until Halloween.  This is about ten hours a week for ten weeks, or 100 hours of scheduled work time.  If I feel I am in need of more time, I may add some hours on Sundays as well.

I lost a little time to the heat (the lights and machines make my sewing area hot even on cool days) and have some stuff going on this weekend - but then it's second star on the right then straight on 'til morning!

Saturday, August 14, 2010

Grading a pattern

I give it a B-.

I kid, of course.  I am just starting the process of grading out a commercial pattern to my size.  I've selected a histrorical pattern from one of the major pattern companies but must increase it in size by a good amount as I am a rather stout girl.  The pattern is Simplicty 9769 from the Fashion Historian series; in hindsight, I kind of wish I had selected Simplicity 2890 as it is a gored corset, and is available up to a size 24.  I'd still need to grade it, but not nearly so much.

For those of you who aren't experts.... grading a store bought pattern is kind of a pain in the bustle.  The steps:

1.  Determine how many inches you need to add by comparing your measurements to the body measurements on the pattern.  Usually they give just a few measurements - bust, waist, hip, back length.  Divide the difference in each measurement in half, as most patterns are bilateral (if you are using a pattern that is not the same on the left and right side, ignore this).

My measurements compared to the pattern's for its largest size:
Bust:  52" measured - 42" on pattern = 10" total increase needed, halved = 5"
Waist :  47" measured - 34" on pattern = 13" total increase needed, halved = 6.5"
Hip:  51" measured - 44" on pattern = 7" total increase needed, halved = 3.5"

2.  Determine how many seams are available to increase.  On this pattern, there are four seams that can be let out (and if needed a little can also be added to the center front and center back).  Each side of the seam will be increased, so I will be adding 1/8 of the necessary amount to each seam.  For me, this means I will be adding 5/8" at the bust, 7/8" at the waist, and a little less than 1/2" at the hip on every edge except the center front and center back.

3.  Make a copy of the pattern pieces as they appear on the tissue.  Include any pertinent pattern markings, including grain line, notches, bust points, etc etc.  Mark in the 5/8" seam allowances, and transfer in any pattern markings along the edge of the pattern.  Be sure to clearly label the pieces.

4.  Measure out from the pattern edges (NOT the seam allowances!) the amounts determined in Step 2.  Redraw the edges.  Use curve templates, it will make your work much easier!  .

One method used to redraw the edges of a pattern is slash-and-spread.  For this, you would make a copy of the pattern without seam allowances, cut each piece vertically (and horizontally if the lengths are also being altered) and simply physically move the edges of the patterns to the new location and retrace.  I will demonstrate this method, as I am taking photos of my workflow.

 5.  Add on new seam allowances (I generally opt for 1/2" instead of 5/8").  Cut and sew a mockup; grading won't guarantee a perfect fit, so do at least one fitting to make any necessary adjustments.  Once you are happy with the pattern fit, sew per the pattern's instructions.

This will take me all weekend.  I am taking pictures, and will either edit the photos into this post as I go or create a new post.

Splitting off

I'm starting some new projects, so I thought it wise to move to a distinct, new blog.  And nothing personal against the lovely people at LJ, but I'm looking to move to a more... ahem... up to date and intuitive blog site.

I have just a few posts in my last journal that are pertinent, so I will paraphrase them for you now:

Recently several of my friends and I have decided we want to go to SteamCon, and make stuff for it.  I am already equipped with some decent costuming skills, so we are planning to sew some Victorianesque garb and have a great time in the doing.  In preparation for this, I managed to purchase an industrial sewing machine for a very good price. It is now up and running in my living room, and today I will be starting the process of fitting myself for a corset.

Self-fitting is tough, but I do hope that my background in fashion design and sewing will see me through.  Expect pictures of the process.